LightBlog

mercredi 29 décembre 2021

XDA Basics: How to set up Windows Hello on your PC

Windows Hello is one of the coolest features introduced in Windows 10, and it allows you to unlock your PC using your fingerprint or your face. You can even use a USB security key this way. While biometric security wasn’t completely new to laptops when Windows Hello rolled around, it became much more common after that, and it also became standardized for any laptop that included it. But how do you set up Windows Hello? We’re here to help with that.

What you’ll need

The first thing you’ll need if you want to use Windows Hello is hardware that’s compatible. Most of the best laptops these days include either a fingerprint reader or an infrared camera for facial recognition. If you have a desktop PC or your laptop doesn’t have one of these things, though, you can buy an external device that handles Windows Hello for you. Check out the options below if you need a Windows Hello device, or see our list of the best webcams out there, a few of which support Windows Hello. If you’re looking to buy a PC, we have a list of Windows Hello laptops you might want to check out.

    Lenovo 500 Full HD Webcam

    Windows Hello camera

    A webcam with an IR sensor so you can unlock your PC easily.
    Kingston VeriMark Fingerprint Reader

    Fingerprint reader

    This USB-based fingerprint reader allows you to unlock your PC more easily.
    Yubico Yubikey 5

    Security key

    This USB and NFC-enabled security key can protect sensitive data on your PC and more.

Another thing you’ll need to set up Windows Hello is to be signed into your PC using a Microsoft account. Windows 10 and 11 already nudge you in that direction, though, so you should be good. You can always add a Microsoft account to your PC by going to the Settings app and choosing Accounts -> Your info. You’ll see the option to add a Microsoft account there. Once that’s done, we can get started.

Set up Windows Hello on your PC

If you just got a brand-new PC and you haven’t set it up yet, the easiest way to set it up is during the initial Windows setup process. After adding a Microsoft account, you can add a PIN, which is required for Windows Hello. Then, if your computer has Windows Hello hardware, you’ll be able to use your fingerprint or your face to set up Windows Hello.

If you’ve already set up your PC or you’ve just bought one of the devices above, here’s how to set up Windows Hello:

  1. Open the Settings app and go to the Accounts page.
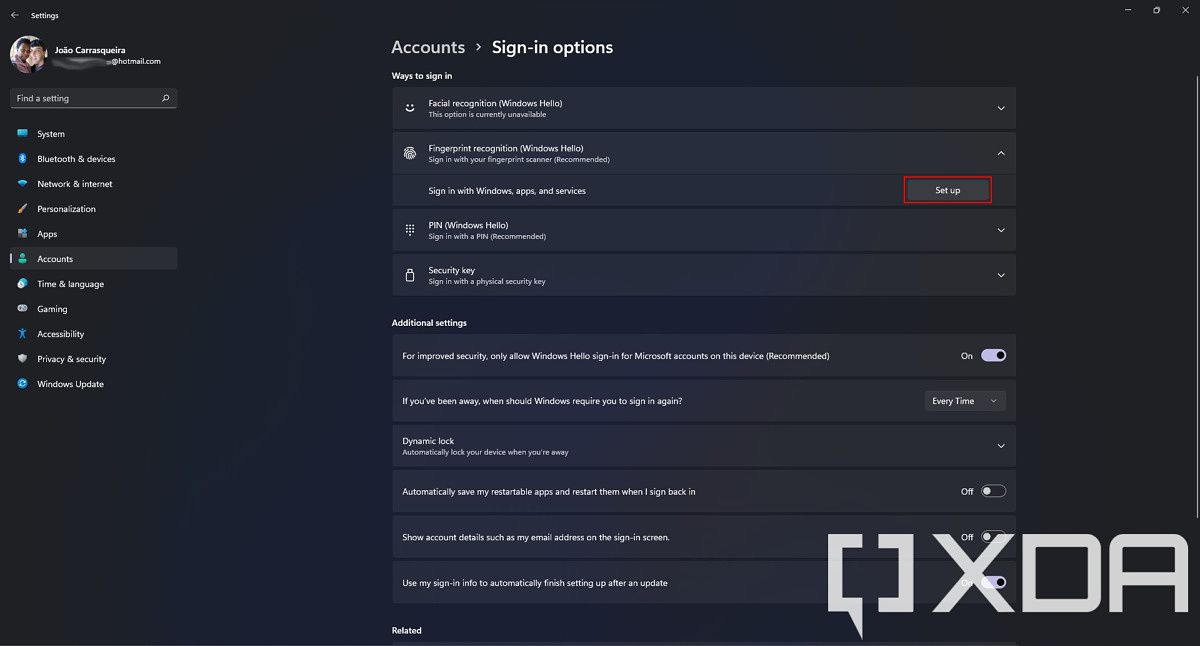
  2. Click Sign-in options. All the Windows Hello settings are available at the top of this page.
  3. Select the type of Windows Hello device you have, then click Set up to begin. If fingerprint recognition and facial recognition options aren’t available on your PC, you’ll see that indication, so this also lets you find out if your PC has any of these methods built-in.
    Windows Hello sign-in options
  4. If you haven’t set up a Windows Hello PIN, you’ll have to do that first. By default, a PIN only uses numbers, but you can use letters and symbols if you want to. You’ll probably want this to be different from your Microsoft account password, though.
  5. Follow the instructions on screen to set up Windows Hello for your device. For facial recognition, you’ll need to line up your face and move it around. For fingerprint recognition, you’ll need to repeatedly tap your finger on the fingerprint sensor in different positions to register your fingerprint.
    • Can’t find your fingerprint reader? Many laptops have it built into the power button, while others might have it on the touchpad or below the keyboard.
      Adding a fingerprint in Windows Hello settings
  6. Once you’ve set up one face or finger, you can add more so you can use different fingers to unlock your PC or grant access to someone else.

And that’s it! You can now use your fingerprint or face to unlock your PC. You can press the Windows key + to go to your lock screen and test out Windows Hello. Tapping your finger on the fingerprint reader or simply standing in front of the camera should unlock your PC automatically from now on.

If you want to stop using Windows Hello, you can head back to the same page in Settings and remove Windows Hello as a sign-in option. You can keep using a PIN as a replacement for your Microsoft account password, which may be simpler and more secure.

The post XDA Basics: How to set up Windows Hello on your PC appeared first on xda-developers.


from xda-developers https://ift.tt/3JrVIfJ
via IFTTT

OPPO Reno 5 and Reno 6 starts receiving stable ColorOS 12 update with Android 12

Back in September, OPPO officially unveiled ColorOS 12, the latest version of the company’s custom Android skin. Since then the Chinese phone maker has rolled out ColorOS 12 beta to several OPPO phones, allowing users to try out an early version of Android 12 ahead of the stable release. including the Find X3 Pro, Find X2 Pro, Reno 6 series, Reno 5 series, and more. Earlier this month, OPPO revealed that it would release stable ColorOS 12 for some of its premium phones later this month. As promised, the company has now started rolling out the stable Android 12 update to the Reno 6 and Reno 5 models.

Hands-on with ColorOS 12 based on Android 12: Here’s everything new in the latest update for OPPO smartphones

According to a series of announcements on the OPPO Community, the stable ColorOS 12 update based on Android 12 has started rolling out to the Reno 5 5G, Reno 5 Pro 5G, Reno 6 5G, and Reno 6 Pro 5G.

ColorOS 12 stable availability:

  • OPPO Reno 5 5G — Indonesia
  • OPPO Reno 5 Pro 5G — Saudi Arabia, the UAE
  • OPPO Reno 6 5G —  Indonesia, India, Vietnam
  • OPPO Reno 6 Pro 5G — Indonesia, India, Saudia Arabia, Pakistan

As you can see, the update is currently only live in select regions. However, we expect the company to expand the rollout to more markets soon. In any case, Reno 5 and Reno 6 series owners residing in the above-mentioned markets can look forward to receiving the OTA notification in the coming days. If you want to skip the wait, you can also trigger it manually. To do so, head to Settings > Software Updates > click on the gear icon in the top right corner > tap “Trial Version” and then click on the “Apply now.” You should receive the new update shortly after.

After installing the ColorOS 12 update, Reno 5 and Reno 6 owners can look forward to many exciting features, including a new wallpaper-based theming system, Canvas AOD, Screen Translate, Background Stream, Android 12’s Privacy Dashboard and privacy indicators, and much more. To learn more about ColorOS 12, check out our in-depth review of the new skin.

The post OPPO Reno 5 and Reno 6 starts receiving stable ColorOS 12 update with Android 12 appeared first on xda-developers.


from xda-developers https://ift.tt/3HjGkQS
via IFTTT

How to make your iPhone read articles out loud with a single swipe

Apple never disappoints when it comes to accessibility features on its operating systems. For example, you can use a Mac with just your voice and control your Apple Watch by clenching and pinching. One of the underrated features on the iPhone is screen reading. iOS can read text out loud for when you’re driving, working on something else, or just not in the mood to look at the screen. This accessibility feature is easy to use and can be triggered with a single swipe. Here’s how to make your iPhone read articles out loud with a single swipe.

How to make your iPhone read articles out loud with a single swipe

How to make your iPhone read articles out loud with a single swipe

  • Launch the Settings app.

How to make your iPhone read articles out loud with a single swipe

  • Scroll down and click on Accessibility.

How to make your iPhone read articles out loud with a single swipe

  • Tap on Spoken Content.

How to make your iPhone read articles out loud with a single swipe

  • Enable Speak Screen.

How to make your iPhone read articles out loud with a single swipe

  • Voila! Now whenever you swipe down with two fingers from the top of the screen, your iPhone will read the content out loud. You can even control the speed of speech if you’re not satisfied with the default 1x. Additionally, you can use the rewind, pause, and skip buttons to control the speech playback.

I personally love this feature because it allows me to listen to articles while doing other tasks in real life. Apple News Plus offers an audio experience, but it’s not available in apps other than News. Speak Screen works across the entire operating system (OS), so you can use it to have your iPhone read long text messages as well.

It’s a very handy addition to iOS that not all users are aware of. Additionally, when compared to Apple News Plus Audio, this feature is available for free and doesn’t require a subscription to work. I find myself using it more than News Plus Audio, even though I’m subscribed to the premium service.

Will you be using this feature to make your iPhone read articles out loud to you? Let us know in the comments section below.

The post How to make your iPhone read articles out loud with a single swipe appeared first on xda-developers.


from xda-developers https://ift.tt/3qwZADJ
via IFTTT

Here’s when you might get MIUI 13 on your phone

At its launch event yesterday, Xiaomi officially detailed MIUI 13, the latest iteration of the company’s Android skin. MIUI 13 packs many exciting changes and improvements such as better app fluency with up to 23% fewer dropped frames, improved multitasking capabilities, privacy enhancements like fraud protection and privacy watermark, new system font, and much more. If you own a Redmi or Mi device and wondering when your phone will get the new update, read on.

In a recent post on Mi Community, Xiaomi detailed the MIUI 13 update roadmap outlining which Redmi and Mi smartphones/tablets will be eligible for the new update. As per the roadmap, the first set of MUI 13 builds will go live on the China Closed Beta branch from December 29, with Public Beta builds to follow suit next month. Meanwhile, the stable rollout is set to kick off from Q1 2022.

Here’s the list of Xiaomi smartphones and tablets eligible for the MIUI 13 update:

MIUI 13 rollout schedule for global models

  • First batch (Q1 2022)
    • Mi 11
    • Mi 11 Ultra
    • Mi 11i
    • Mi 11X Pro
    • Mi 11X
    • Xiaomi 11T Pro
    • Xiaomi 11T
    • Mi 11 Lite
    • Mi 11 Lite 5G
    • Xiaomi 11 Lite 5G NE
    • Xiaomi 11 Lite NE
    • Xiaomi Pad 5
    • Redmi 10
    • Redmi 10 Prime
    • Redmi Note 8 (2021)
    • Redmi Note 10 Pro
    • Redmi Note 10 Pro Max
    • Redmi Note 10
    • Redmi Note 10 JE


MIUI 13 rollout schedule for Chinese models

Public Beta version — First batch (mid-January 2022)

    • Xiaomi Civi
    • Xiaomi MIX 4
    • Redmi K40 Game Enhanced Edition
    • Redmi Note 10 Pro
    • Xiaomi 11 Ultra
    • Xiaomi 11 Pro
    • Xiaomi 11
    • Xiaomi 11 Youth Edition
    • Xiaomi Pad 5
    • Xiaomi Pad 5 Pro
    • Xiaomi Pad 5 Pro 5G
    • Xiaomi 10S
    • Redmi K40 Pro
    • Redmi K40
    • Redmi K30S Extreme Edition
    • Redmi K30 Extreme Edition
    • Xiaomi 10 Extreme Edition
    • Xiaomi 10
    • Xiaomi 10 Pro
    • Redmi K30 Pro
    • Redmi Note 11 5G
    • Redmi Note 9 4G
    • Redmi Note 9, Redmi 10X Pro
    • Redmi 10X and Xiaomi CC9 Pro
  • Second batch (TBD)
    • Redmi Note 11 Pro
    • Redmi Note 11 Pro+
    • Redmi K30 5G
    • Redmi K30i 5G
    • Redmi K30
    • Xiaomi 10 Youth Edition
    • Redmi Note 9 Pro
    • Redmi Note 10
  • Stable rollout — First batch (end of January 2022) 
    • Xiaomi 11 Ultra
    • Xiaomi 11 Pro
    • Xiaomi 11
    • Xiaomi Pad 5 Pro
    • Xiaomi Pad 5 Pro 5G
    • Xiaomi Pad 5

The post Here’s when you might get MIUI 13 on your phone appeared first on xda-developers.


from xda-developers https://ift.tt/32Oz54w
via IFTTT

mardi 28 décembre 2021

This excellent wireless gaming mouse from Corsair is $20 off today

Corsair sells a wide variety of PC hardware and accessories, including power supplies, PC cases, mice, keyboards, headsets, and much more. One of the company’s best mice is the Corsair Dark Core Pro SE (what a name!), which is now on sale for $69.99 at multiple stores. That’s a discount of $20 from the usual price.

This is a wireless gaming mouse, packed with a custom PixArt PAW3392 optical sensor for sensitivity levels of up to 18,000 DPI, Omron switches for all the buttons, nine-zone dynamic RGB lighting, onboard storage for saving custom macros and light configurations (so you don’t need Corsair’s software installed on every PC you plug the mouse into), and a total of eight programmable buttons (including the two main buttons).

    Corsair Dark Core RGB Pro SE
    This wireless gaming mouse is $69.99 at Amazon and Best Buy, a discount of $20 from the usual price.

Just like most other wireless gaming mice, the Dark Core Pro uses a 2.4GHz USB wireless adapter to connect to your PC, so there’s no noticeable latency. The mouse also supports Bluetooth connectivity, so you can use it with devices that don’t have a free USB port (or so you don’t have to bring the adapter with you everywhere), and you can just plug it in directly over USB. There’s a USB Type-C connector on the mouse for charging the internal battery — no microUSB here, thankfully.

Perhaps the most unique feature of this mouse is that it also supports Qi wireless charging, which is only found on a few other competing gaming mice (like the Logitech G502 Lightspeed Wireless). Corsair doesn’t sell a mouse pad with Qi wireless charging anymore, but you can still place the mouse on top of any standard Qi charging pad when the internal battery is low.

This is a great option for anyone interested in a new gaming mouse, or really anyone who wants a wireless mouse without the occasional frustrations and latency of Bluetooth — you can always turn all the RGB lights off if you’re not a fan of The Gamer Aesthetic™.

The post This excellent wireless gaming mouse from Corsair is $20 off today appeared first on xda-developers.


from xda-developers https://ift.tt/32AolXb
via IFTTT

Complete Data Recovery with Wondershare Recoverit

Don’t leave yourself vulnerable to the many different types of data loss that can happen at any moment. Any type of digital information that is stored on your laptop, phone, USB drive, or similar devices, can be corrupted or lost. You can use Wondershare Recoverit to perform an in-depth search and recovery of missing or corrupted files. You can try the software for free, to perform a search and see if your data is recoverable.

Different Types of Data Loss

Managing all of the different files you come across at work or your personal life is always a hassle. We all experience a moment when we accidentally delete a file that we need. Happens with photos, emails, videos, documents, etc. Luckily it’s usually simple to recover these from your trash or the recently deleted section of your phone. When they’ve been cleared from that, then it’s time to use recovery data to get them back.

Formatting a hard drive or USB drive entirely is another common way that people experience data loss. This can happen when installing a new operating system, performing a system recovery, or simply by connecting storage to a new device. Formatting usually wipes an entire drive, which requires special software for hard drive recovery.

Malicious viruses can cause all sorts of data loss. Some are designed to delete your files, while some viruses force you into a full system reset. Even after clearing a virus out of your system, you can be left with damaged and unreadable files. Recoverit will be able to scan and fix certain types of data, including a dedicated tool for video files.

Simple Data Recovery with Wondershare Recoverit

All of the different data loss situations described above can be resolved with Wondershare Recoverit. This software is free to try, with affordable purchase options for larger projects. If you’ve experienced any type of data loss, chances are that Recoverit can help. The software is compatible with a massive range of devices, including:

  • Computers
  • Hard drives
  • USB Drives
  • Memory cards
  • Phones
  • Cameras
  • and more…

With support for over 1,000 different types of files, you’ll be able to recover just about anything you’re looking for. Documents, videos, audio, photos, emails and more will be able to show up during your scan. Recoverit prioritizes the preservation of your data by running a non-destructive scan that won’t further corrupt any of your missing data. The software is easy enough to use that you don’t need any technical skills to operate it. The scan process is quick and shows you any recoverable files in real-time.

Step 1 – Download and install Wondershare Recoverit here.

Wondershare Recoverit Download Page

Step 2 – Run a scan and select the files you want to recover.

Wondershare Recoverit Scan Results

Step 3 – Preview the files and begin the recovery process.

Wondershare Recoverit Purchase Options

Best Features in Wondershare Recoverit

Use Recoverit for advanced video recovery features. In the world of video editing, corrupted videos files are a common problem. This can often happen in the transfer process from an SD card. If you run into this problem, you can scan the files with Recoverit. Recover your Ultra HD, 4K, and 8K videos to keep them intact.

The Recoverit Advanced version is capable of aiding you in corrupted, truncated, and broken video repair. It provides you with two repair modes – quick and advanced repair, meeting different needs and improving the repair quality.

Wondershare

With the Crashed Computer Recovery feature, you can rescue your data from a crashed system. Recoverit will help you create a bootable USB drive that will allow you to access the files on a crashed computer. It’s a very simple and effective tool and will be very useful in a desperate situation like this.

If you’ve experienced data loss, it is recommended that you download Recoverit and run a scan as soon as possible. The sooner you run a scan, the higher your chances of recovery are.

We thank Wondershare for sponsoring this post. Our sponsors help us pay for the many costs associated with running XDA, including server costs, full time developers, news writers, and much more. While you might see sponsored content (which will always be labeled as such) alongside Portal content, the Portal team is in no way responsible for these posts. Sponsored content, advertising and XDA Depot are managed by a separate team entirely. XDA will never compromise its journalistic integrity by accepting money to write favorably about a company, or alter our opinions or views in any way. Our opinion cannot be bought.

The post Complete Data Recovery with Wondershare Recoverit appeared first on xda-developers.


from xda-developers https://ift.tt/3Jp2zXh
via IFTTT

Download the new MIUI 13 wallpapers for your smartphone

The Xiaomi 12 series has just launched with the new Qualcomm Snapdragon 8 Gen 1, and with it comes MIUI 13. While MIUI brings a bunch of new features and improvements including some privacy features and a new system font. Not only that though, but there’s a set of new wallpapers too. If you’re not in the market for a new phone but want to give your current daily driver the Xiaomi 12 look, you can now download the MIUI 13 wallpapers from the links below. These wallpapers are extracted from the MIUI 13 firmware.

MIUI 13 wallpapers

MIUI 13 comes with 43 wallpapers, in a mix of resolutions, though the majority come come in at a 2400×1230 resolution. They are divided into five categories: Molten Glass, Crystallization, Concerto, Natural Texture, and Black Gobi. The crystallization wallpapers are made in collaboration with Beauty of Science.

If you like what you see, you can download the uncompressed, full-resolution wallpapers from the link below. These wallpapers can be applied on any device, though you may need to crop them to fit them to your phone’s resolution.

Download MIUI 13 wallpapers

MIUI 13 also has a set of new live wallpapers, though those aren’t available for download yet. We’ll be sure to share those as well when they become available. Let us know in the comments below if you do end up using these wallpapers and which you use!

The post Download the new MIUI 13 wallpapers for your smartphone appeared first on xda-developers.


from xda-developers https://ift.tt/3Hf42O7
via IFTTT